Showing posts with label photoshop. Show all posts

Color Palettes


Color palettes are an amazing source of inspiration.  I have always enjoyed looking through color palettes but never knew how to create one of my own before now.  Today, I discovered Colour Lovers and I can already tell this will be a new creative addiction!

Colour Lovers allows you to create color palettes from their enormous library of colors, or you can create your own color palette from your uploaded photos, like I did above.  I was able to upload my own photo and click on specific areas in the picture to select the colors for my palette.  If the color was not already in their library (although this is very unlikely) it allows you to create a new color!  Pretty impressive, right?!

Once you have selected the perfect color palette, you have the option to upload the color swatches into your Photoshop library (or any other computer design program) and incorporate them into a custom layout or project you are working on.  

For me, there is something really visually appealing about square images. I decided to create a 6in x 6in document size with a 4in x 6in photo on top, a thin line of white space and then a 1 3/4in x 6in color palette with the exact colors uploaded into my swatches palette in Photoshop.  Colour Lovers gives you detailed instructions on how to download your color palettes in this article.  

Imagine the possibilities!  Create color palettes for weddings, parties, home decor, artwork and inspiration boards!


Five Favorites: Photoshop and photography links

I spend a lot of time in Photoshop and with my camera.  I have learned a lot through trial and error and have also stumbled across some amazing sites that have pointed me in the right direction.  Thank goodness for the internet and the ability to search just about anything!  Over the past month I have discovered all of these sites/blog posts and spent a lot of time playing, learning and creating.   Today I am sharing them all with you.  Have fun!


An etsy shop full of beautiful photography overlays, textures, digital frames and more.


Make your own blog button design {Tutorial}

Playing in Photoshop is one of my favorite hobbies.  I. LOVE. it.  Maybe I have mentioned this a time or two?!!

In a few weeks, I will be participating in JessicaNDesigns handmade gift guide on her blog and decided to make a new blog button to promote my shop.


While making new blog buttons, I decided to share with you a little tutorial that can help you not only make your own blog buttons, but also fade an image and layer text.  

Are you ready?!  Here we go!
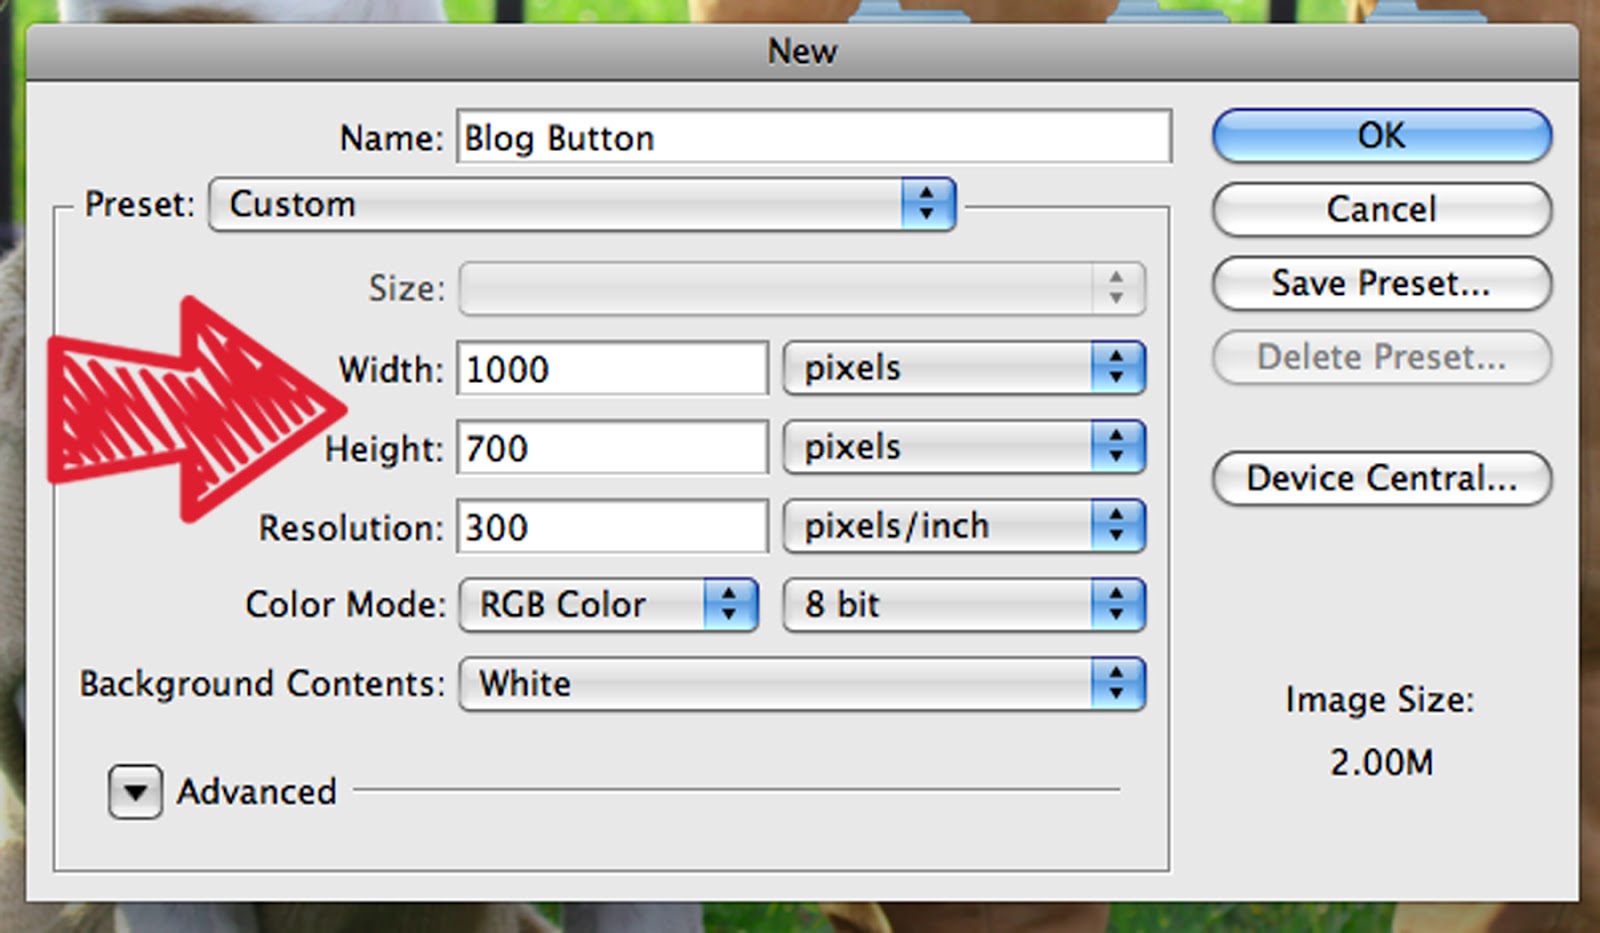
1.)  Open Photoshop {naturally} and go to file --> new and type in a name, then decide what size you want the image to be.  My title is blog button and the size needed to be 250 x 175 for Jessica's site.  I like to work with bigger images first, so I made mine 4 times bigger than that and started with 1000 pixels by 700 pixels, which I will size down to 250 x 175 when I am done.  Hit OK.

2.) Next, upload any pictures you would like to use in your blog button.  I wanted to include my new chevron tee.  Go to file --> open --> select photo --> open.  

The first thing I do when I open an image is to make a duplicate copy of the locked background image.  This way you can manipulate the image and have a copy to refer back to.  If the layer is locked, you can't really do much.  Click on the layer that says background, hold it down and drag it to the new layer icon at the bottom of the layer palette.  The new layer icon is second in from the right.  
Now you can see that you have two layers.  You can leave them both visible, or hide the locked one and just view and work with the copy.

3.) Depending on your image, you might have to resize it.  My images are huge file sizes, so I resized my picture before dragging it onto the original canvas I created titled Blog Button.
To resize, go to edit --> transform --> scale and a box will appear around the entire image.  Hold down shift to keep the same proportions and adjust the picture size.

You are now ready to drag it into the original canvas you just created with the correct pixel dimensions!

4.) Using your pointer tool in the top right of your toolbar, hold down on the image and simply drag it to the plain white canvas behind the current image, titled blog button.  Once on the new canvas, position the image to your liking.  I decided to place mine on the far left of the canvas because I am looking to the right.

5.) Create a new layer.  Click on the same icon second from the right on the layers palette that we used in step 3.  Drag the layer down one to position it just below the background image layer (the one with your photo). 
In this layer, you will fill it with a color that is similar to the rest of your image.  Change your foreground color and then use your paint bucket tool to fill in the color on that layer.

I chose a light tan color that was a similar shade to the book pages.

Photobucket

6.) Apply a layer mask to layer with your photo.  To do this, click on the icon in the layer palette 3rd in from the left that looks like a grey square with a little white circle in the center.  Once you click on it, a white box will appear on the picture layer.  

7.) Select the gradient tool on your left toolbar.  Make sure the gradient setting is foreground to transparent.  With the mask layer selected, you are ready to apply a gradient to the image that will fade the color layer into the picture.
*hint - if you hold down shift while drawing the gradient line, it will create a perfectly straight line for you.

Let go of the mouse, and..... ta-da! 

Your picture fades into the background color!


You can play around with the length of the gradient to add more or less of a faded look.

8.) Now it's time to add extras to your button design!  I added text and a dotted line to my button.  To apply text, click on the large T on the left toolbar and select a fun font and color on the top toolbar.  I made my text right justified because I thought it was the most visually appealing.


To make my line dotted, I used the eraser tool and and just erased pieces of the line to give it a natural dotted look.

9.) Once your image is awesome and you are done adding anything extra, you are ready to size it down.  Remember how my image needed to be 250 x 175 pixels but I made it 1000 x 700 pixels to work on a larger scale?  Well, it's time to scale it back down.  Go to image --> image size and then change the 1000 pixels to 250 and the 700 pixels to 175. 

So there you are friends.  A tutorial on how to create your own awesome blog button design!


What I'm working on

What I'm working on...
A new blog series that will give you a look into what I have been working on in the past week.  I always love seeing artists in action and what current projects they have started in their studios.  On Wednesdays I am going to give you a look into what I am currently working on whether it is for LBF or just a look into art projects outside of my work.

This week I have been working on giving my shop, blog and facebook a new look.  I've had in my mind some changes I wanted to make for when I reopened my shop for 2012, and decided to start with new marketing and designs.  I wasn't sure exactly what I wanted, so after trying to force something in Photoshop over the weekend, I decided to give it a days rest and try again Tuesday.  Once Tuesday rolled around, I couldn't close my computer.  I created a new Facebook logo, new business cards, blog buttons, blog header and Etsy banner!  All the designs flow nicely together, but are all different from each other. 

Take a look...
blog header
blog promotion/giveaway button

etsy banner


new business cards (front side)

new business cards to ship with packages (back side)
blog button

blog button


facebook image


I'm loving the new look, but need to do some tweaking with the text color. It's been challenging to get the yellow/green text to look the same in different color profiles and from image to image.

So there it is, your first look into What I'm working on post of 2012!

Setting Goals


Yesterday and today I thought a lot about Little Blue Feather and new goals for 2012.  I took a pad of paper, and started writing down one idea or goal per sheet of paper.  Some of my goals are personal goals, while most are related to LBF.  

Speaking honestly, something I tend to struggle with is numbers; how many page views, sales, "fans", etc. Just about every blog interview I read, the artist/shop owner always says to blog/create for yourself and do not worry about numbers or who is following you.  Although I think this is great advice, I also think there is comfort in numbers.  If you spend hours making a new item, photographing it, listing it to your website and including in your social networking sites, you hope that people are reading and sharing an interest.  It helps validate all of your hard work and time.  In the online world, it is so easy to compare.  You can look at another blog and see that they might have 3x the amount of followers or sales, but the only healthy comparisons are to compare year to year, or month to month within your own blog and shop.  If I compare LBF in 2011 to 2010, I can see huge improvements and changes in that year.  I can see how far I have come and it encourages me to keep going; as opposed to comparing my business to someone else's.  So the past couple days I have tried to reflect on that.  How far has LBF come in the past year?  Where do I want it to go in 2012?  What are changes that worked well and what are things that failed?  This is what's on my mind as I set goals for the new year.


What are my new goals and ideas for Little Blue Feather?!  

  1. Focus more on content instead of numbers.
  2. Apply for at least one large indie-craft fair in 2012.  You might remember my trip to the Renegade Craft Fair this past September.  This show is at the top of my list.
  3. Make something new every week to list to my shop.  This could be a completely new product, an old design in a new fabric, a new applique...ya know.
  4. Print pictures and create inspiration boards and photo journals instead of keeping them on the computer.
  5. Learn to sew something new every month.

This past year has been filled with so many new things.  For example, it wasn't until Spring 2011 that I started this blog!  I feel inspired and ready to see what happens in 2012.  Because I am a visual person, I created a photoshop image with my favorite quote that I heard this past year.  It is now printed and ready to hang above my workspace!


I hope you have great memories from 2011 and are looking forward to 2012.  

Happy New Year Friends!


Photobucket

{Photoshop Fun} - New LBF Marketing

Photoshop; oh how I love you.  Creating new blog buttons, editing pictures, drawing new designs and making cards are some of my favorite things to do in my spare time.  

Something about the color combination of the green and the blue, the font and the hand drawn feather, the lines and brightness make me love the images below.  Simple, bright and Little Blue Feather style...


Blog promo button for my giveaway on JessicaNdesigns blog last week.

Little cards shipping with orders to promote LBF outside of Etsy.

Before and After: Photo Editing

I have a new toy that I can't seem to get enough of.  Meet my new Canon SLR camera :)


Last month I waited very impatiently for the geek squad to fix my camera and unfortunately my camera couldn't be fixed.  This was sad, but it was also kind of nice that I still had insurance on the old camera and I was given the full amount I paid for it 3 1/2 years ago.  {phew!}  Instead of purchasing the exact same camera, I decided to apply that amount toward a new camera!  And oh my I am in love with it!


I know cameras are a lot of money, but now that I am an online shop owner, blogger, wife, and mother to adorable little bostons I decided it was worth the investment to purchase a good camera that I knew would get a lot of use.  I do think it is easier to take good photos when you have a good camera, but there are always ways to improve your photos, no matter what type of camera you have!  


Photo editing
The truth is, I edit about 90% of photos uploaded to my computer, especially the photos I upload to my blog and my etsy shop.  Sometimes it just takes simple adjustments to make a photo look a lot better.    Here are some examples of how editing can change or enhance the look of your photos.

increased contrast and color adjustment.
think about how cropping an image can give it a better focal point.
crop and try black and white.

crop and color adjustments were made to this photo to better show detail and the actual colors of the design the way it appears in person.
brighten an image and crop slightly.  images not perfectly centered can be more interesting.

have fun with a photo and try a lot of color and contrast adjustments.
Photo editing can be a lot of fun and addicting.  It is worth spending a couple minutes {give or take} on each photo to improve the look of it.  I have seen really cool photos that were surprisingly shot with a tiny point and shoot or even a camera phone.  If you are new to photography or you just started an online business and need to take photos of your products, try looking up blog posts and tutorials on how to get the best shots.


When I'm not playing with fabrics...


I love playing with fabric. Looking through fabric.  Shopping for fabric. Sewing fabric.  But when I am not doing those things, I can't get enough of photoshop and taking pictures.

Ever since high school I have loved taking pictures.  In college, I had a crazy amount of pictures and music on my computer and also carried around 2 jump drives with projects from my photoshop, illustrator and CAD classes.  If I could play around in photoshop all day and call it a job, I don't think I could say yes please fast enough!  Of course sewing would need to be included in my weekly schedule as well ;)

Photoshop fun:

textured vintage photo editing.  I love this candid shot my friend took at our wedding.

Photobucket
 diptych project from college.  the textured background is very faint music lyrics.
drawing free hand in photoshop.


What do you do when you procrastinate?!

Photoshop Tutorial: Watermark your images with these easy steps

Recently I have had more and more people telling me how they discovered LittleBlueFeather.  I have tried to promote my items through my blog, guest blog features, facebook, twitter, pinterest, {you get the idea} and the truth is, the more work you do getting your name out there, the easier it is for people to find you!

Unfortunately, with this comes the possibility that someone will take credit for your photos, inspiration or even worse, take your hard work and claim it as their own.  I have read a few articles over this past summer about people that had their identities stolen, their work claimed by someone else and one woman even said an image of her work became a logo for another company.  EEEK!  Isn't that awful?

The internet can be a great place, but you have to protect yourself from all the negative possibilities.  I have been able to sell handmade items, find amazing bloggers, get inspired and learn new things from my wonderful little computer.  The important thing is just to protect yourself.  Last week I copyrighted my designs and have made it a point to watermark all my work images, because really you never know where your photo might turn up!

If you are unsure what a watermark is, and how to add one to your photo, read below and follow the easy steps :)

watermark: A text or image overlay to a photograph or image that identifies and claims the work of that artist or person.  The text or logo is created in a way that is somewhat transparent and discourages others from copying and claiming the work as their own.

Do you see the watermark on this image below?!


You can decide where you want to place your watermark, the text, size and if you want to repeat it over the entire image.  Here is another example:


So are you ready to watermark your own images?!  I use photoshop on my computer.  If you do not have photoshop, hopefully these steps can help you with a similar program you have on your computer.

Step 1) Open Photoshop on your computer.  Then go to file, open to select the photo you want to watermark.


Step 2) Go to Window and make sure your Layers palette is visible.  


Step 3) Make a text box to type your company or name in that box.


*Make sure the text is the size and font you like and then change the color of the font to a pale grey.


Step 4) Click on the second icon from the left on the bottom on the layers palette and then go to blending options.


Step 5) The first thing you want to do in the layer style blending options is to change the fill opacity.  I like to reduce mine down to around 15%.  If you look at the picture on the left, you can barely see the text.


Step 6) On the right side of the layer styles box, you will want to click bevel and emboss and drop shadow.  When you click on bevel and emboss text, new options will appear.  Below are the numbers and options I like to use.  This is an area you can play around with things to see what you like best.  


*Now the text is more visible than shown before and you can see the effects added underneath the text layer.

*Using your pointer tool, move the text to wherever you like on your photo.

Step 7) This step is optional.  If you would like to repeat your text multiple times over the image, click on the layer and make sure it is highlighted.  While holding down on the layer, drag it over the second icon from the right to create a layer copy.

*Notice the layer copy and copy 2?  Again, using the pointer tool, drag the extra text wherever you want on the photo.


Now you are ready to save your image!!  Go to file, save as and then select where you want to save the image on your computer.


I hope this tutorial is useful for you in protecting your images!  Please let me know if you need any further help :)